Hướng dẫn cách làm file Ghost đa cấu hình cho Windows 7 bằng công cụ Sysprep có sẵn của Windows
Xem thêm
Cách tạo 1 bản ghost đa cấu hình All Main Win 7 8 XP X32 X64 đầy đủ Driver
Hướng dẫn tạo ghost đa cấu hình win xp/7/8/10 tự nhận Driver bằng Easy Sysprep v4.3.28.599
Việc tạo ghost vẫn luôn là hữu dụng, thay thế cho việc cài win mới từ đĩa, giúp giảm tối đa thời gian để có 1 bản win hoàn thiện đúng ý thích. Bên cạnh việc tạo ghost cho chính 1 máy của bạn thì tạo ghost đa cấu hình để dùng được trên nhiều máy khác nhau cũng rất hay. Có nhiều công cụ giúp tạo ghost đa cấu hình như Spat, easy sysprep, ...
Nhưng hôm nay mình giới thiệu các bạn 1 cách dùng chính công cụ có sẵn trong Windows nhé. Nó có tên là sysprep (Windows)
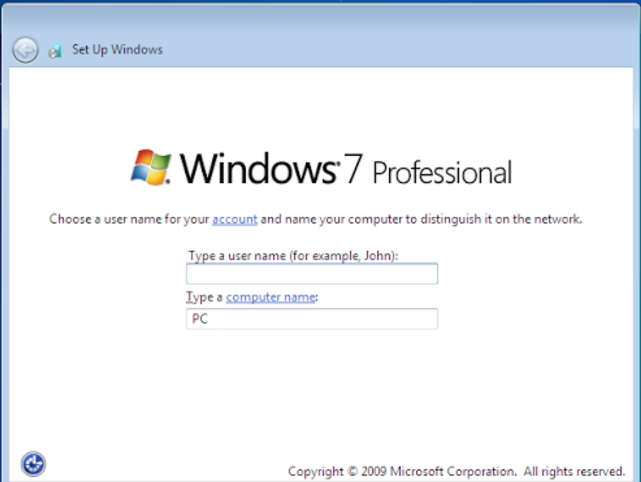
Bước 1: Trong quá trình cài đặt Windows 7 đến bước nhập Computer Name, bạn nhấn Ctrl + Shift + F3 để truy cập vào chế độ Audit Mode. Tại đây bạn sẽ vào được Windows với quyền Administrator.
Bước 2: Tại chế độ Audit Mode, nhấn Cancel trong cửa sổ Sysprep hiện ra. Lúc này bạn tuỳ ý cài đặt các phần mềm và tuỳ chỉnh, tính chỉnh các chế độ theo ý thích của mình.
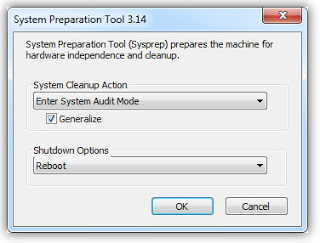
Bước 3: Thiết lập cấu hình sysprep
Ban đầu phải xoá thư mục Panther trong thư mục Windows và Panther trong thư mục System32\sysprep, vì nó không cần thiết. Mở trình soạn thảo Notepad lên và lưu lại file có tên Unattend.xml, còn nội dung bên trong như sau:
Lưu lại vào thư mục gốc của ổ D
Tiếp đó mở Command Promt rồi gõ lệnh, hoặc Copy cũng được
Sau quá trình sysprep diễn ra, gõ lệnh exit để thoát khỏi CMD.
Cuối cùng là dùng bất kì phần mềm tạo ghost nào như Onekey ghost chẳng hạn. Vậy là thành công rồi đó, chúc bạn thành công
Xem thêm
Cách tạo 1 bản ghost đa cấu hình All Main Win 7 8 XP X32 X64 đầy đủ Driver
Hướng dẫn tạo ghost đa cấu hình win xp/7/8/10 tự nhận Driver bằng Easy Sysprep v4.3.28.599
Việc tạo ghost vẫn luôn là hữu dụng, thay thế cho việc cài win mới từ đĩa, giúp giảm tối đa thời gian để có 1 bản win hoàn thiện đúng ý thích. Bên cạnh việc tạo ghost cho chính 1 máy của bạn thì tạo ghost đa cấu hình để dùng được trên nhiều máy khác nhau cũng rất hay. Có nhiều công cụ giúp tạo ghost đa cấu hình như Spat, easy sysprep, ...
Nhưng hôm nay mình giới thiệu các bạn 1 cách dùng chính công cụ có sẵn trong Windows nhé. Nó có tên là sysprep (Windows)
Bước 1: Trong quá trình cài đặt Windows 7 đến bước nhập Computer Name, bạn nhấn Ctrl + Shift + F3 để truy cập vào chế độ Audit Mode. Tại đây bạn sẽ vào được Windows với quyền Administrator.
Bước 2: Tại chế độ Audit Mode, nhấn Cancel trong cửa sổ Sysprep hiện ra. Lúc này bạn tuỳ ý cài đặt các phần mềm và tuỳ chỉnh, tính chỉnh các chế độ theo ý thích của mình.
Bước 3: Thiết lập cấu hình sysprep
Ban đầu phải xoá thư mục Panther trong thư mục Windows và Panther trong thư mục System32\sysprep, vì nó không cần thiết. Mở trình soạn thảo Notepad lên và lưu lại file có tên Unattend.xml, còn nội dung bên trong như sau:
Mã:
<?xml version="1.0" encoding="utf-8"?>
<unattend xmlns="urn:schemas-microsoft-com:unattend">
  <settings pass="windowsPE">
    <component name="Microsoft-Windows-International-Core-WinPE" processorArchitecture="x86" publicKeyToken="31bf3856ad364e35" language="neutral" versionScope="NonSxS" xmlns:wcm="http://schemas.microsoft.com/WMIConfig/2002/State" xmlns:xsi="http://www.w3.org/2001/XMLSchema-instance">
      <SetupUILanguage>
        <UILanguage>en-US</UILanguage>
      </SetupUILanguage>
      <InputLocale>0409:00000409</InputLocale>
      <UserLocale>en-US</UserLocale>
      <UILanguage>en-US</UILanguage>
      <SystemLocale>en-US</SystemLocale>
    </component>
  </settings>
  <settings pass="oobeSystem">
    <component name="Microsoft-Windows-Shell-Setup" processorArchitecture="x86" publicKeyToken="31bf3856ad364e35" language="neutral" versionScope="NonSxS" xmlns:wcm="http://schemas.microsoft.com/WMIConfig/2002/State" xmlns:xsi="http://www.w3.org/2001/XMLSchema-instance">
      <AutoLogon>
        <Enabled>true</Enabled>
        <LogonCount>1</LogonCount>
        <Username>Administrator</Username>
      </AutoLogon>
      <OOBE>
        <HideEULAPage>true</HideEULAPage>
        <ProtectYourPC>3</ProtectYourPC>
        <HideWirelessSetupInOOBE>true</HideWirelessSetupInOOBE>
        <SkipMachineOOBE>true</SkipMachineOOBE>
        <SkipUserOOBE>true</SkipUserOOBE>
      </OOBE>
      <DisableAutoDaylightTimeSet>true</DisableAutoDaylightTimeSet>
      <TimeZone>SE Asia Standard Time</TimeZone>
    </component>
  </settings>
  <settings pass="specialize">
    <component name="Microsoft-Windows-Shell-Setup" processorArchitecture="x86" publicKeyToken="31bf3856ad364e35" language="neutral" versionScope="NonSxS" xmlns:wcm="http://schemas.microsoft.com/WMIConfig/2002/State" xmlns:xsi="http://www.w3.org/2001/XMLSchema-instance">
      <ComputerName>Administrator</ComputerName>
     <RegisteredOwner>Administrator</RegisteredOwner>
    </component>
    <component name="Microsoft-Windows-Security-Licensing-SLC-UX" processorArchitecture="x86" publicKeyToken="31bf3856ad364e35" language="neutral" versionScope="NonSxS" xmlns:wcm="http://schemas.microsoft.com/WMIConfig/2002/State" xmlns:xsi="http://www.w3.org/2001/XMLSchema-instance">
      <SkipAutoActivation>true</SkipAutoActivation>
    </component>
    <component name="Microsoft-Windows-SystemRestore-Main" processorArchitecture="x86" publicKeyToken="31bf3856ad364e35" language="neutral" versionScope="nonSxS" xmlns:wcm="http://schemas.microsoft.com/WMIConfig/2002/State" xmlns:xsi="http://www.w3.org/2001/XMLSchema-instance">
      <DisableSR>1</DisableSR>
    </component>
    <component name="Microsoft-Windows-ErrorReportingCore" processorArchitecture="x86" publicKeyToken="31bf3856ad364e35" language="neutral" versionScope="NonSxS" xmlns:wcm="http://schemas.microsoft.com/WMIConfig/2002/State" xmlns:xsi="http://www.w3.org/2001/XMLSchema-instance">
     <DisableWER>1</DisableWER>
    </component>
    <component name="Microsoft-Windows-powercpl" processorArchitecture="x86" publicKeyToken="31bf3856ad364e35" language="neutral" versionScope="NonSxS" xmlns:wcm="http://schemas.microsoft.com/WMIConfig/2002/State" xmlns:xsi="http://www.w3.org/2001/XMLSchema-instance">
     <PreferredPlan>8c5e7fda-e8bf-4a96-9a85-a6e23a8c635c</PreferredPlan>
    </component>
    <component name="Security-Malware-Windows-Defender" processorArchitecture="x86" publicKeyToken="31bf3856ad364e35" language="neutral" versionScope="NonSxS" xmlns:wcm="http://schemas.microsoft.com/WMIConfig/2002/State" xmlns:xsi="http://www.w3.org/2001/XMLSchema-instance">
     <DisableAntiSpyware>true</DisableAntiSpyware>
    </component>
  </settings>
  <settings pass="generalize">
    <component name="Microsoft-Windows-Security-SPP" processorArchitecture="x86" publicKeyToken="31bf3856ad364e35" language="neutral" versionScope="nonSxS" xmlns:wcm="http://schemas.microsoft.com/WMIConfig/2002/State" xmlns:xsi="http://www.w3.org/2001/XMLSchema-instance">
      <SkipRearm>0</SkipRearm>
    </component>
  </settings>
  <settings pass="offlineServicing">
    <component name="Microsoft-Windows-LUA-Settings" processorArchitecture="x86" publicKeyToken="31bf3856ad364e35" language="neutral" versionScope="nonSxS" xmlns:wcm="http://schemas.microsoft.com/WMIConfig/2002/State" xmlns:xsi="http://www.w3.org/2001/XMLSchema-instance">
      <EnableLUA>false</EnableLUA>
    </component>
  </settings>
</unattend>
Lưu lại vào thư mục gốc của ổ D
Tiếp đó mở Command Promt rồi gõ lệnh, hoặc Copy cũng được
Mã:
CD %systemroot%\System32\sysprepsysprep /generalize /oobe /quit /unattend:D:\Unattend.xmlSau quá trình sysprep diễn ra, gõ lệnh exit để thoát khỏi CMD.
Cuối cùng là dùng bất kì phần mềm tạo ghost nào như Onekey ghost chẳng hạn. Vậy là thành công rồi đó, chúc bạn thành công
- Chủ đề
- co san cong cu da cau hinh tao ghost